HF1 - Black Day in Hatten Reprise

We are returning to this scenario, which I have played once before (here though I note I gave it the wrong scenario number), as we continue inside the Hatten campaign scenarios. I am the controlling the defence and this time am trying out the potentially more risky forward defence. My flanks are basically open and should the American attackers wish to sweep round either then that is fine. I would switch to holding the more forward victory buildings.
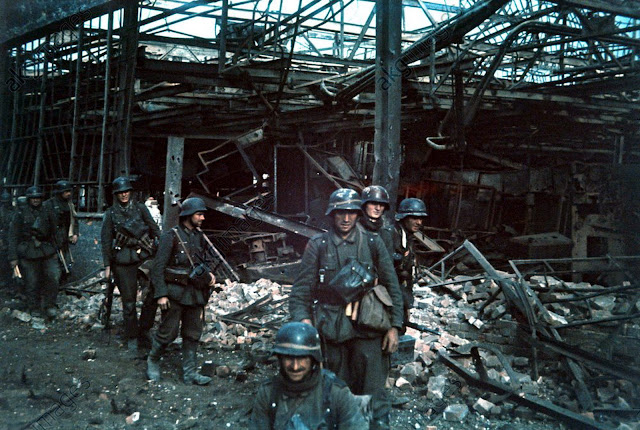
Setups

Yet another thrilling setup shot.
The American do look like they are concentrating on the more open left side with plenty of nasty smoke opportunities looking likely to come my way along with a nasty kill stack in M12 (2 6-6-7s+medium machine guns and the 9-1)
US Turn One to US Turn 2
In my last play of this scenario the US attacker took his time amassing massive firepower and force advantages and slogged his way through the town. In the end this approach was too slow and I won that. This opponent has followed a very different path. It looks like he is screening the town and attempting to flood down through the open ground to the South (left of the board) before turning and flooding forward into the town. This means he is faster but also means he is leaving some of the heavier nuts to crack until potentially the end of the scenario.
Anyway bar ALL his smoke attempts failing honours were broadly even turn one. I laid a medium machine gun fire lane which wiped out a full US squad due to residual but in return lost a half squad in E11 from a critical hit from a Tank Destroyer. Since most of the flank was dummies the US approach was broadly successful with a couple of the Tank Destroyers being particularly aggressive and parking very close to my 8-0 plus DC and a full squad with PSK. The psk failed repeatedly to hit over a defensive then a prep fire phase with the 8-0 doing a sterling job of dragging all the fire onto himself (he broke eventually on a point blank critical 24 shot that 'just' broke him). Didn't help it take out the Tank Destroyer in F5 though (it was hull down and with a double to hit smacked into the wall instead). I then fired the squads inherent at a 2nd line half squad and on a two morale check they rolled snake eyes and generated a hero. It feels almost insulting getting one off a 2nd liner (admittedly a conscript would be worse).

Loads of U.S aggression on the open flank which was admittedly more open than it first appeared.
My opponent then decided to try and wipe the PSK squad from existence and tried to overrun it. After some study of the overrun sheet I decided to fire the PSK as the Tank Destroyer entered and just hit it. A PSK on a lightly armed Tank Destroyer is (bar a 12) a guaranteed kill and that's what occurred with a burning wreck generated with some very helpful smoke which should help that squad bug out (it survived the half strength overrun attack).
This was cheering as it meant the far East flank was now more solid and the US is likely to need two out of the three victory buildings at that end of the town. I needed the cheer as my machine gun had pinned and been unable to pull back from the US advancing troops (I had considered self breaking thinking this lost the medium machine gun but would probably save the squad - until I noticed they could still see M11 so if they broke they would be destroyed due to failure to rout). Both the attacker and defender were half squaded in the combat but I fully expect death in my next turn considering its hand to hand.

Some pressure starting in the center but the wreck of the first Tank Destroyer is burning merrily in the top left providing useful cover for my lads to get back to protect the field gun.
Stop for the week here!
German Turn 2 to US turn 2
The Americans are certainly going all out with them making a huge push in the main town zone in their next turn. As is often the case with US troops in ASL I managed to drive most of them off due to the low morale but most of those will be returning the turn after so I see trouble ahead. I did manage to push all the central thrust back and one squad managed to get in combat with my 9-1 and a squad with a light machine gun. Sadly no ambush (for me, to be honest I am delighted when I don’t 'get' ambushed' but the resultant hand to hand would be dangerous. Strangely though both sides casualty reduced again so that combat continued. In the German turn I took a risk on the low US morale and shot into the combat at point blank as I had little confidence in surviving and the US squad pinned. This meant a much better chance of success and survival. Now I am playing the forces of evil in this scenario but my US opponent showed US Civil War levels of ruthlessness and shot his tank destroyer into the combat as well! The first shot broke all participants - a fact I was satisfied with as it meant my leader would get out but he had rated and he shot again and the second shot killed all participants! I suppose the 'no quarter' scenario rule is being represented to the full.
At the other end of the village the other tank destroyer took a huge flanking sweep to take position eight next to a victory building at K4 in a not so subtle attempt to dampen the arrival of my reinforcements. A hero (generated the previous session) and a 6-6-6 plus a half squad tried to get to the East village side but were prevented by a double one hit by the field gun which wiped the hero from existence and broke the squad and the half squad was hit with a long shot and also went. This allowed my reinforcements almost free reign. I sent one squad in to re-demoralize a broken full squad and fell victim to missing rule knowledge. I was quite happy parking a second line squad next to it and letting it move about Demoralized but since I did not realise that if there are no viable rout locations any location not in open ground can be a location it managed to skip away - it will take a turn to get back but I would have occupied a different building to prevent that had I known that.

Tank Destroyers sweeping forward into a crappy muddy hellhole
On the other side I sent an officer and squad plus light machine gun to rally and reinforce the gun and then sent my valiant 8-0 with demolition charge to soak up fire from another Tank Destroyer. Hoping he was much like a goldfish and had already his last attempt to get next to one. He did this admirably again absorbing a 2MC from the Anti-Aircraft gun before being broken by a point blank shot from the main gun. I then tried a 4-4-7 next door and the tank destroyer took the intensive fire shot and didn’t break the gun but did break the squad (damn it). With a final roll of the dice I dashed the 8-1 and squad from across the road into the building next door. These boys then took an advance fire shot which caused a failed morale check which stunned the tank making it basically immobile, no machine gun, open topped, versus a squad with a negative one leader for minus 5 (I think) on the roll and the 2nd Tank Destroyer turned into a burning wreck.

Now a second Tank Destroyer is out (middle top right) this time in Close Combat. The central town is looking much weaker now.
Another stop here and we return to play next week.
German Turn 3 to German Turn 4
The US forces took another turn to pound the far end of the town succeeding in wiping out another squad and unfortunately breaking my previous 'star' counter of the 5-4-8 with LMG in the walled enclosure through his sniper. The flanking forces at the same time started approaching my gun not entirely successfully due to the aforementioned gun but the loss of a half squad was 'weak' payment for the breaking of one of my elites…I had to get something across to try and give my troops time to rally (which was fortunate as the elite squad 'didn't' rally that turn) but did bring back a broken 1st line that put a speed bump in the middle of the village and gave me time to get the 9-1 officer across along with a second squad. This meant it was dangerous to go all out up the Rue Principalis as I still had a concealed full squad eagerly awaiting open ground movement… things were starting to look dicier for the forces of good.

Nordwind 'cold'
Then in the US 5 rally phase the 5-4-8 and another squad came back so I suddenly had a large reserve force sitting at the fulcrum of the main town where it could cover all three of the remaining victory hex zones.. This changed the force estimate for the US who now had the dial moved from 'medium' to 'hard' and they had to go for some extreme actions to try to pressurise the victory buildings. Firstly the last Tank Destroyer snuck its way through the map Dming as it went to park itself in the rear where it soaked up a shot from the gun which had to swing 2 covered arcs to shoot it (a missed LOS there apparently as the US were not expecting to get pounded by the field gun) this did mean the gun was no longer protecting itself from the local U.S infantry but if I can get the TD then the Americans have to take all the victory buildings. They did have the forces for this but would need to be lucky.
Half squads and one full started congregating around the gun breaking another defender and the officer down there. In the centre a squad plus medium machine gun used the stone building cover to get next to another victory hex and one of the right hand kill stack squads bit the bullet and moved into the shell holes next to my concealed squad. I could not resist that so took the shot and half squaded them with a kill result but they actually passed the resultant Morale check and broke me next turn - there goes my 'last turn hail mary charge round the back to re-occupy a victory building' chance. One key thing to hurt the US here though was that my suddenly rallied 4-6-7 and 5-4-8 + light machine gun + 9-1 officer had a line of sight to one of the squad plus mediums next to a victory hex and 12 up 2 is a good shot especially against 6 morale troops and the officer was killed with the squad broken, elr'd and half squaded. One threat down.

The town looks stabilized but the final Tank Destroyer refuses to blow up. Note my amusing concealed SMC counter placement at the top left at H3 just beyond the gun - the victory hex is to the right of it in I4
To try to 'slightly' protect the victory building next to the gun I moved a concealed officer on his own next to the US full squad in my rear. The idea being he could not simply assault move into a stone building next to the victory hex.
Last turn played
The Americans had a task though not an impossible one. They had to take two of the remaining three victory buildings which were situated at(for them) the top left of the map - next to the field gun, the top right of the map next to a now burning tank destroyer and finally in the upper section of the main town. The US made a play against all three with some interesting tactical decisions in the movement phase.
Let's cover up to the end of that phase target by target
Top Left by the field gun

Victory hex in I4, I3 has the concealed SMC, G4 a half squad with PSK and there is an officer and full 6-6-6 squad in G3
Here there was a concealed officer in the 'safe' path to the hex and the Americans had a 7-0 officer, full squad and a half squad and (potentially) the tank destroyer as leverage with the field gun, one full 4-4-7 a concealed officer and a half squad opposing. They started with the full squad bumping the concealed squad revealing the officer and then attempting a SMC overrun. For this he had to get the officer to pass a task check with the terrain entered counting as a plus. He rolled a 3 and with a '7' 'just' passed. They then swarmed in and pushed the officer out to the building behind. At this point they took an 8 + 2 shot from the 4-4-7 which broke the squad. The half squad then bypassed that hex not getting affected by the 4 residual and moved into the open on the road on the other side where a final fire 4 down 2 broke them as well. So by the end of the movement phase the Americans were down to a single 7-0 officer next to the victory hex but hand to hand can be called and the odds there would be 6 or less (6 with ambush) with me needing 11.. Even if the US won I am not sure a single man counter can control a victory hex so the US now could not take this victory building.
Top Right

The US also managed to get a Cx'd half squad in K4 from somewhere. The victory hex is K3 where I have a 4-6-7 with a LMG
Due to the failure in the previous step extremely risky methods were needed. The US player here had a single half squad and potentially the Tank Destroyer versus a single 4-6-7 with a light machine gun. First up he fired smoke from the Tank Destroyer, my field gun fired heat, hit! (but with no more heat) then I rolled an 11 for the kill roll when I needed 10…..It then started up and I hit again with the much less achievable 6 not close too. It then rolled out of line of sight and bypass froze the defending squad!
This gave me many varied options. It had no machine gun, open topped, street fighting would count so if I passed a 7 task check I would have a 5 CCV with -2 meaning a 7 would immobilize or a 6 kill. Plus if I went for Antitank Magnetic mines that would increase to 10 to immobilize and 9 to kill! Looking at it that 'chance' would need a slightly above average chance with the task check and the a 1-3 on a single. Failing the first roll or rolling a 6 on the second would pin me making it harder to win any following combat. The next choice was potentially to use triple point blank fire against the open topped tank destroyer with a 20 up 3! An average roll there would need cause a 1MC but the US armour leader was in that TD so had 9 morale for passing these checks. The third alternative would be to hunker down and do nothing until the US combat phase. This would not need a task check and when the Americans moved the other half squad into combat it would be sequential combat (they had 'almost' no chance to break me with advancing fire - the half squad was in firing in smoke and advancing so a 2 + 6 shot and the TD had no working machine gun). The Americans would be unlikely to go hand to hand (I would need a 9 to win outright with no ambush required) so would probably go standard combat where I still would only need a 7 and they would need a 4… Good odds and probably the best choice available.

U.S forces still pushing hard.
There was one other and that was to try for a Panzerfaust which could be combined with a full triple point blank fire shot. Here I just risk a '6' pinning me - which admittedly would give the US half squad a more even chance in the CC phase. I did not pin though and did have a Panzerfaust available so now had a good odds close shot and hit which then gave me a 'anything but a dud of 12 kills' and the last Tank Destroyer blew up with a burning wreck result. Now that poor US half squad had an even harder shot (2 + 8!) but did have a potential ambush roll available and if it gained that then hand to hand becomes a better shot with a 7 needed.. So the top right was still obtainable but since the last Tank Destroyer was gone the US needed all three victory hexes (the SMC control thing might mean they already couldn't do it as well).
Central Town

Note the non-dmd squad in M11 which needs re-dming to prevent a possible re-occupation of K11 in the final German turn. The Bazooka in K8 is on the floor as is the lmg in M8 which actually I think has been misplaced and shouldn't be there...(bad counter management on my part - I think it was from the hex in combat wiped by the TD)
The US had slightly more forces here. They had a 5-4-6 with officer to their left side, a negative one officer and 6-6-7 with medium machine gun and a 3-4-7 with another medium machine gun on the right. Defences were strong though with a full squad on the victory hex, another full squad next to it and the 5-4-8, 9-1 with light machine gun in the rear. I also had a broken full squad without DM counter in the road.
The US plan went as follows. The Half squad plus Medium re-Demoralized the broken squad in the road (apparently my opponent was worried that with 7 morale it might rally in the last turn and skip merrily into a victory hex in the rear). This took the half squad out of the main combat and left the final charge to two officers and two full squads. The 5-4-6 and officer went first piling behind the victory hex where the 5-4-8 with 9-1 easily broke (8 up 1). That left the final squad plus decent officer. These moved into the road next to the victory hex where the first 8 down 2 shot pinned the officer but not the squad then the second 8 down 2 broke the squad as well. At this point the US conceded as they could not win that hex, would have a 10% chance of the top right and probably could never take the 3rd.

End positions with a final burning Tank Destroyer causing one of those common suicidal charge for victories!
Conclusion
Another hard fought but fun game. I'm getting some nice firsts in though and re-meeting several rules for more unusual activities. This is my first kill with a Panzerfaust and for my opponent (whose been playing for a long time) had his first SMC overrun. The US player was probably around half a turn behind where he needed to be and I do wonder if it was not the dummies on the flank along with that initial flank approach that caused the difficulties. The Hatten map is still great fun though and the optional hand to hand really spices things up as well.

U.S infantry covering the Church for snipers.

Reread the AAR. Apologies if I did not make a comment earlier. Great write up. Thanks. Andy Rogers
ReplyDelete