BoF2 - Polish Requiem

For you twenty Zloty – though I’ll take ten for a date with your wife and that rather jazzy neckscarf!
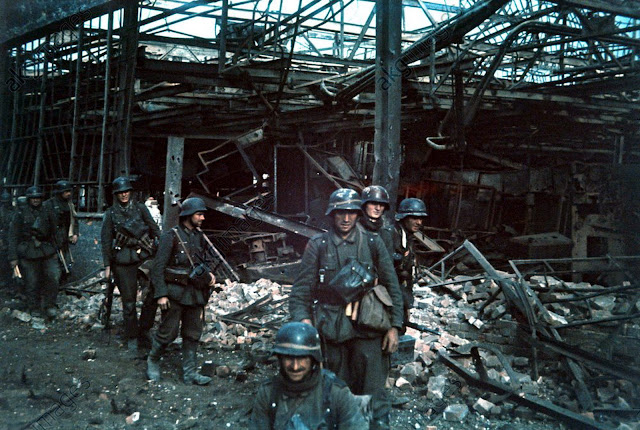
It is between the 14th-17th September 1939 and Germany is invading Poland – Guderian moved over Warsaw to the North and had then bypassed it the East to try to seize the fortress of Brzesc in an attempt to cut Poland in half. This area would eventually be part of the Soviet controlled Poland so the Germans even advised the Soviets that they would be temporarily violating the Russians ‘eventual’ territory.

A Polish General – Konstanty Pilowskie hurriedly organized a fighting force of three infantry battalions, an engineer battalion, artillery and several obsolete tanks training companies using almost WW1 era French tanks.
As our battle starts on the 14th September tanks of the 2nd Battalion the 8th Panzer Rgt of the 10th Panzer Division commanded by General-leutenant Ferdinand Schaal (Schaal like other 10th Div members Claus von Stauffenberg and Albecht von Hagen was an eventual senior member of the July 20th plot against Adolf Hitler) attempted to catch the garrison by surprise and take the fortress fast. Polish infantry and the 113th light tank company successfully held against the attack.

Generaleutenant Ferdinand Schaal
The Germans could not be stopped for long though and the fortress was taken unopposed three days later. The Russians eventually gained control and garrisoned it and during the invasion of Russia in 1941 the fortress held for seven days. (Though Soviet mythology has the defenders holding until the 20th July and even has a recent war film celebrating the brave defence ‘Fortress of War’ made in 2010)
Units
The Germans have a mis-match of early war tanks with two Panzer Ivc’s being the local behemoths of the engagement. The Poles are running some very outdated ex-French Renault FT17 tanks with a crazy turn of speed at ‘5’ with ‘6’ possible if the tank is CE.
Though outdated at this point it was actually a revolutionary design for its time (and its time was during the 1st world war) as it was the first ever tank design to have a revolving turret and a crew setup copied by almost every tank ever since.
Setup

For this scenario I labelled key features in the combat area and then decided on the five most obvious German Schwerpunkts
So in terms of scenary the South of the map has the Victory Building, a manor with attached orchards and workers cottages then in the center of the map we have two hills, Farm A, Farm B and a Hamlet.
The potential German advances are
Red – Westerly sweep through the bottom of the map starts in East
Blue -westerly sweep through Farm A starting NE
Green – Starts NW but when reaches farm B sweeps inside towards VB
Purple – Starts NW but carries on to manor before sweeping down
Yellow Starts West sweeps to West of grain fields and drops down to Victory Building past the Manor

Now I do not expect yellow as time is short and the German tanks would get badly separated from their infantry (still may be worth a punt by the German player to block retreat lines and shake up the defenses). Equally Red is not so likely as it is terrain intensive and by the time the attackers reached the center the Polish Reserves would be storming on. An aggressive commander might take this option to deal with the reserves fast.
Blue, Green and Purple are this the most likely as they all take a median approach time but one that potentially allows the Germans to take up more favorable defensive positions to deal with the far more numerous Polish reserves
Setup
Cocked up as usual. I shall blame the gap between games. Forgot to add foxholes, and left one of the deployed half squads not on board. That will teach the cursed hun a lesson as to how highly my Polish warriors respect him. Wait a sec, going off tangent.

I went for a middle defense approach with several advanced dummies to try and push the Germans Northwards and away from the reserves. My best bet was a delaying game so I wanted to add distance. The Germans responded well to this aiming for a cunning mixture of the Green and Yellow plans. The majority of their force was following the green route but an elite subsection (9-1, two elite squads, two light machine guns and a Mark IV) were skulking along the yellow. I suspect they are hoping I get drawn into combat in the center and they can then sneak behind to mass for the win.
First two turns
This is (somewhat unusually) my first game of VASL with Skype as most of my other games have been PBEM. Helped by some very impressive game aids and advanced knowledge of special keys it was actually much better than I had feared. The Germans were taking no chances and either armored assaulted or scuttled around the rear of the woods. The odd valiant half squad tried to draw fire unsuccessfully as I sat and sulked or should that be skulked. Indeed the only fire occurred with my two forward tanks. The 37* got in a pathetic duel with a 20L only won when the 20L malfunctioned its own armament. My other forward CMG trundled merrily out of the wood and did exactly nothing to German plans so making a good representation of the actual Polish defense (apologies to any Polish readers, you were actually screwed whatever you did). At the end of our first nights play I had to make the important decision as to where the reinforcements would arrive and secondly whether to fight the Germans at Farm A. This plan had advantages as it would keep them further back from the victory area but had the disadvantage of a lot of German force and a high probability of VBM freeze spoiling my day.

Verdammt, die Waffe hat versagt
I decided I wanted to delay the Germans but not get trapped by them so bought my reinforcements in almost centrally. The tanks moved in a line near the victory area. Though not particularly effective they can form a line that will either distract opposing tanks of help with the infantry.Most of the infantry reserves moved forward to (hopeful) blocking positions in the center with one squad plus medium machine good taking up a fire lane supporting position on the right (I dont expect the lane to do much except help nudge the Germans through the grain.) Finally the elite squad with a dc moved behind the German tank.

Apart from that the Polish turn was mostly relevant for a firegroup attack against my forward concealed squad that woke my sniper up. Nothing worthwhile as he broke a German squad with the officer who were promptly rallied next turn. Nice to see he was awake though.
In German Turn 3 the forces of evil started swinging North whilst half squads started poking the central defence. My elite squad was easily broken by TPBH by the German tank (booo) but in return two poking half squads were broken and in a lucky stroke a full squad merrily running up the map to flank my forces was hit by a chancing HE shot from one of my 37s and broke.

Position at end of German movement. The flank push is developing.
In my next turn there was the usual ASL good and bad. The good was that I pulled nicely out of the front position breaking another half squad along the way. The bad was that I broke my forward medium machine gun (totally on the following ‘6’ repair roll) and then lost a squad to the German sniper after an utter waste of a snake eyes on a pin check. My valiant lead tank was also (finally) brewed up in the German turn 4 prep. In return one of the German Mark IV’s malfunctioned its own armament.
This puts my defence in a more precarious state as the Germans can far easier swamp around to the North.

German Start Positions Turn 4 or perhaps 5…not quite sure now
Problems continued in the German turn four. It’s not that my defensive plan was flawed just that the troops (and dice) refused to carry it out. The Germans merrily VMB’d three forward squads. One of these (an elite squad plus officer) failed its attack check and pinned when the combined squad would have had an above 50% chance of wiping the tank. Now it will have to face a triple point blank attack next turn to have a chance at survival. The squad in the wood to the North left residual that another tank drove through and got hit with a double one that failed to do anything to the occupants. Then the final half squad broke on its morale check. To make matters even worse the German ATR took a long shot at one of my in motion tanks over at around 12 hexes and critical hit and turned it into a burning wreck. Sweet. Not. My counter balance was one German squad killed but considering the amount of stacked movers I also managed to miss things are looking bad for the Polish army.

I was expecting the Germans to push through the center but was obviously misinformed as instead they actually disengaged and swung around to the North. The two tanks that had me nicely trapped shifted off to the South and trundled through the big grain field to set up flanking positions covering the far section of the victory area. The final panzer attempted to overrun the squad in Z7. This failed (phew) and my tank next door (which had been immobilized earlier) was able to hit it in the rear at point blank range blowing it up.
My tanks did ok this turn with the Panzer I in Z3 getting a shock (which eventually resulted in its elimination)
We broke for a few weeks here and this allowed me to do one of my favourite things – pre-planning. Below is the screenshot of positions prior to the Polish turn 5 start.

The only problem rallies were in O6 – if any of those squad rallied then they could prevent my troops running merrily towards the victory area. Beyond that I had an open slate. Almost open as I actually forgot the unbroken half squad in RR8 and that I had unbroken squad under the destroyed tank in Z7. The key thing was that I was ignoring the tanks. The Germans needed two with functioning Main Armament in the victory area but also 3 good order squads. He had two practically guaranteed (in DD2) so it was that final squad I wanted to deal with. There were two and a half squads that could conceivably get to the victory area (Y3, X1 and T0) and the T0 half squad would be a hail mary. So therefore my plan was based around causing problems for the other two.
I started by trying to tempt fire and moving a half squad to V1. It did not work. I then started my tanks and trundled one over the wall, the lack of movement points really hurts…the intention here is to block the direct route to the victory area and possibly allow me to drive tanks onto enemy infantry in the victory area preventing good order and thus the win. Then the recalled tank started moving to the edge. Here the lack of movement helped as it would be right in the way of the Germans if it moved. Therefore the Panzer IV brewed it up in Z9. The infantry move almost went okay but I had not noticed the line of sight from X1 and my officer and squad were pinned ? and the forgotten about half squad also managed to pin my other full squad (damn it). Everyone else got in position (more or less) though the Panzer IV using its Machine Guns to shoot at my full squad under the destroyed German tank I had forgotten about was unpleasant (they survived which was admittedly cheerier)

End of Polish Turn Prior to advances
Final Turn
My big worry here was the German armour. There were five tanks available and since the Germans only needed two I fully expected the other three to drive over and sit on top of my best placed infantry to try and allow easy movement by the infantry. Things worked out differently though. First up several of the tanks prepped and this turned out badly for the forces of evil with the following impressive range of die rolling from the VASL bot

So in turn that is the Panzer IV with broken MA (it was trying to lay smoke) and the other Panzer IV (whose MA was already broken) with no working weapons.
Then onto movement. The lowest panzer started up rumbled to the wood, dropped smoke then shifted to the victory area and stopped (providing an obstruction for my turn). The infantry then started moving. The remaining Panzer II armoured assaulted to cover two squads to just outside the victory area. Then the two key squads. I broke one but the other counter exhausted and got through. The only German problem was that all three were on the same hex thus made an attractive target.
Polish Final Turn
I had several good opportunities here so used the useful threat of the Officer plus DC to allow me to move several squads into good locations. I lost three squads broken to German fire! But did manage to get a squad next door to the key German hex of CC9. Due to the clever smoke placement my tanks had no chance to enter the enemy hex but two did move closer and stop and the final (in the barn) passed its radio text and reversed backwards potentially allowing another high odd shot at the danger stack. Then the officer set off and was greeted with a hail of fire. He took (and passed) a MC 3 then a MC 2 then a MC 1 then (next door to the German infantry stack) took a final fire 14 flat (+2 smoke –1 NAM –1 officer) shot which caused a NMC which he failed. So near yet so far. Montgomery would commiserate…
So it was down to assault fire and if assault fire failed CC9 could advance in for a 3to1 combat which would need to be survived. His first shot was decent with a 5 (I think) which with 5 firepower (4 doubled for point blank, halved for Assault fire +1 assault fire bonus) was enough for a 1MC. The officer failed (whoopee, no –1 combat and all three squads would need a Task Check at +1 so I might pin a couple) then the Counter Exhausted squad failed it’s morale check and the Poles had won.

Comments
Post a Comment