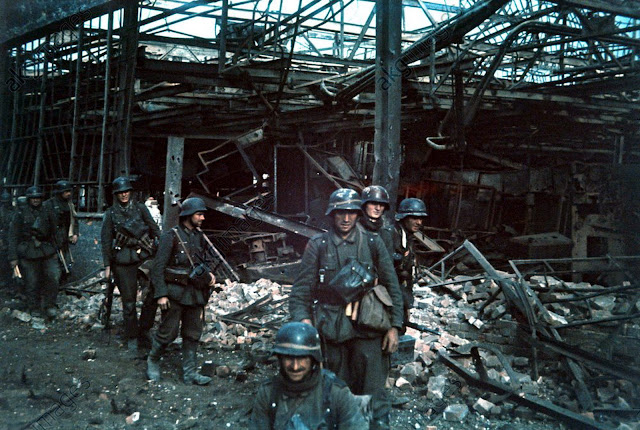
RB3 - The Bread Factory

If anyone attempts to get fresh with you use this handy pepper spray. See..easy
Fortunately for me a new ‘skype with boards’ opponent rolled around. He was ( much) better than I was at playing but with good dice luck I could win. Our first game (summer 2015) was this scenario.
Next up a return to pushing cardboard (over Skype) and a return to RB3 ‘The Bread Factory’. I have played this before as a PBEM game and got absolutely trounced in around two turns by a combination of multiple double ones whenever a concealed unit moved close and total mis-understanding of the wall advantage rules. As a plus those two turns gave me a better understanding of what the scenario is all about for the Germans so it will be interesting as to whether I learned the correct lessons or not.
Anyway this scenario provides some heavy hints as to what the scenario designer expects to happen. The berserking officer and masses of concealment terrain mean that the German can get close and avoid open ground but has to do so fast enough that the hordes of Russian reinforcements do not arrive in time. The close match in sizes (without much ‘Attacker’ spare fat to absorb casualties) is much because the victory buildings are two hexes from the German start line and in full view so the Russians have no space to carry out a fighting withdrawal or collapsing bubble type defence.
In the last game I utilised several suicidal scouting half squads which did exactly that (i.e died) .This time I intend to move slower first turn and retain concealment. Then second turn as the assault drives in I plan on offering my opponent some prime shots against dummy stacks in an attempt to reduce fire. I would like to do the same down south but here the order of battle is perfectly balanced between being a good attacking force and giving the game away. For example you would like the DC to be with the elite squad but that is also the perfect squad to carry the light machine gun. If I try and use my dummy tactic here and mimic a squad plus dc then the 5-4-8 really needs to be hidden with the dc inside the concealed stack as everything else would be visible. This though lowers available fire power which is needed as this is Stalingrad…In the end I decided to risk an early one on the berserking officer and keep an extra concealment with one of my 2-4-7 scouts.
So plan wise in the West I intend to use an opportunity fire kill stack in D41 with 18 fp (more seems wasteful of units) and the negative 2 officer. The remaining troops will mass to advance concealed until all hell hopefully lets loose in the second turn. All the aggressive moves in the first turn (moving next door to a victory hex building) have the sole purpose to make the Russians shoot and reveal themselves to the opportunity firing squads.
The First Few turns
My Plan worked relatively well for the first turn. The Russians proved unwilling to shoot much so I had to go to extreme lengths to get a target forward and in the end advanced my psycho officer with the dc and two and a half squads next door to F42 which then caused some grudging shots from the ground on both the victory hexes revealing the 8-1 with the heavy machine gun and a squad in G43 and a squad in F42 but only managed to pin the squad. My own return fire was better with my Elite southern squad managing to wound the 8-1 leader (on a box cars morale check) . Then my kill stack opened up on F42 and broke the squad and revealing the HIP gun (the crew passed the morale check)! This then led to my first important decision – whether to advance the officer (with dc) into either victory hex. In the end I thought – sod it and moved him in causing him to promptly be killed in standard combat though I managed to repeat the compliment by killing the crew. The demolition charge dropped to the floor and would become important later on.

‘This’ is the bread factory. They need a new architect
The next turn was a mixed bag really. My concealed stacks rolled slowly forward (getting their feet into the first victory building), several of my squads were broken by fire and in the second surprise of the day another HIP Russian squad appeared in the Northern Administration building in the cellar – A 4-5-8 (these guys were tough..) along with the 9-1 and no less than two medium machine guns (which was a clever trick as it avoided the area fire effect of shooting from the cellar but gained the fortified advantages at the same time). The biggest events here were firstly the two combats (one in G42 and the other on the ground floor of the admin building). I won the admin one handily but everyone died in the lower combat. The other was the remarkable skills of the Russian Sniper who was very active and this turn drilled my 9-2 officer in the head causing the kill stack to disintegrate into a 2nd line half squad and broken 2nd line squad.I lost another half squad to booby traps in shell holes. Curse those Russian gangsters..Finally on the Russian turn my opponent, unwilling to let me hold on to my ill gotten gains in G42, launched a counter attack with two squads of his own who ambushed and cut my defending two squads to pieces. This along with the squad in the top floor battle hardening to fanatics seemed a sign of bad things to come.

The Russians are about to launch their successful counter attack versus G43 and the 4-5-8 is about to go fanatic on a shot from the 5-4-8 below. Elsewhere can be seen the remains of the kill stack in D42 and the tough Russian cellar squad in G41
As it stands those bad things were not realised. A lonely half squad in F42 had picked up the dc (dropped by the officer on his death) and then survived a hail of fire from the surrounding Russians (including a two morale check), with no ill effects, then placed the Demolition Charge which on explosion broke both defenders. This allowed me to reclaim G43 and in some eventual defensive fire my elite squad with the light machine gun managed a morale check on the fanatics on the first floor – not expecting much I was amazed when they failed the check and were destroyed for failure to rout..the victory hex buildings were mine. Lots of time to go though.
In the other Russian stronghold, the Administration building, things had moved to and fro with neither side able to implement a knock out blow and eventually I just shifted my lads away from the cellar dwelling machine gun toting psychos who pass every morale check and moved them up to block some rout paths and start preparing for the arrival of the Russian reinforcements storming up the board.

Position End of German turn 3. The reinforcements can be seen along with the disintegration of the original Russian position. The Russian Heavy Machine Gun in G43 is actually being used by a German half squad.
After a week break we returned and I was, dare I say it, fairly confident that my oppo faced a mountain to climb to win. This, as always, is guaranteed to anger the ASL dice gods and so Russian turn four started with the dual medium machine guns gaining the rate tear from hell. Around four rates all of 4 or less ripped my defences to pieces and left me staring at at a suddenly dangerously thin defence. To make matter worse on the few occasions I did pass a pin/morale test the Russian sniper woke and hurt me some more. All was not lost though and some of my squads provided some to be true Germanic heroes. My valiant J44 elite squad broke no less than two advancing enemies and pinned a third before breaking on the advance fire shot.

The Russian attack is hotting up. The (now broken) squad in G45 did good work causing all the breaks and pins to the right of the board.
This did not stop the Red Army from swarming forward and G43 was put under particularly large pressure taking and passing several nasty checks including a massive fire group of 24 up 4 (one of the fire group was cxd as can be seen above) in return a lucky counter pin on the squad in H42 allowed me to advance in combat where I took the safe option of melee (as opposed to hand to hand) and promptly only casualty reduced my who opponent leaving two and a half squads stuck in melee. Now came the German turn six and the dice Gods relented. My prep fire was deadly and ripped any close Russian squads to pieces including a rate by the squad plus light machine gun in G43 that broke two squads and killed a further. My sniper then woke up a couple of times whilst the Russian had obviously popped off for some vodka, or ammo… The Russians only positive was a conscript in I45 who managed to break two squads and an officer who had successfully drawn its fire only to break to break in a final protective fire shot (that typically broke my valiant 5-4-8 squad for the third? time that game)

Here you can see the massive amount of residual (each with its own broken squad/half squad/officer caused by the now dm’d conscript on I45. The Germans in H41 and I42 are about to advance into combat with the pinned squad and utterly fail to ‘decide’ the game by that combat. The game was practically over at this point bar the suicide charge.
. The Russians last turn was therefore one of those ‘charge and die’ attempts that many of us are familiar with. The ‘down two’ (and a couple of ‘down threes’) were vicious and broke practically every remaining squad leaving the wounded officer and a cxd officer unbroken next to the victory buildings. At this point my oppo conceded as with a broken squad on the first floor it would be almost impossible to actually drag control back from me.

The End..That is two lonely officers versus a lot of Germans.
This was a great game and a good introduction to the Red Barricades rule and maps. I feel I was lucky in my more suicidal tendencies early on. The game certainly swung backwards and forwards with that familiar feeling that ASL is so good at providing. In the post game discussion it was mentioned that my opponent had considered taking his medium machine gun squads into the sewers so they could pop up next door to F42 and encircle me but hadn’t due to other (lucky for me) moves that had needed a different response. He also mentioned two other clever Russian techniques he thought of post game. The first was to place a commissar in the cellar of I41 allowing broken squads to pile through the trench and almost certainly rallying to get sent straight back with the second being to use the roofs of either of the victory hexes allowing a last move drive with the impact of surprise. Good potential tactics . All in all it gave a great impression of Stalingrad city fighting and the map was also a joy to fight over.

Someone said this was the ‘Bread Factory’ so where did these chickens come from?.
If I had to pick my ‘star squad’ it would be the 5-4-8 plus Light machine gun that broke a lot but kept coming back and its defence of the J43 factory stopped just enough Russians moving forward that the rest of the lads were able to cope. The award of ‘most sucky counter’ is harder. My 9-2 ‘allowing’ himself to get shot by a sniper caused a lot of damage but he wont get the award. I shall split it between the Heavy Machine gun that refused to get picked up and after turn one broke everyone who dared eventually touch it and the 7-0. This hero managed to casualty reduce two squads when ‘not rallying them’. I expect better from the boys in Field Grey.

Comments
Post a Comment