ASL232 - Chance D'une Affaire

We are continuing our early war Croix de Guerre scenarios with this fun mashup set 14th May 1940.
The Germans are refuelling their armour by a large Chateu so the Panzer's crew have temporarily abandoned their vehicles protected by a small group of infantry. Considering the huge masses of French infantry about to arrive you might consider this as a defensive scenario for the Germans but it is anything but. The Germans are not amazing quality but the French are appallingly bad and as the game goes on the Germans get continuing reinforcements so that by the end of the scenario they should have almost numerical equality. When you consider that the French are all Green so will be shedding soldiers throughout the scenario with very little chance of rallying and this gets much harder for the soldats.
The map is also cunningly chosen. The Orchards are in season and the German start formation must set up within 2 hexes of the Chateau. This means that a lot of the approach paths are shielded from fire with two blind hexes BUT naturally there is at least one open ground hex to traverse before reaching that safety. This introduces one of those conundrums that I suspect scenario designers love. Since my troops are all green I have to stack with officers to give them enough movement to get across the map to the target buildings but to avoid a nasty down three shot on entry I should definitely not stack...There is an alternative as I believe there are two approach hexes which are adequately screened costing me one hex but avoiding a painful shot in return.

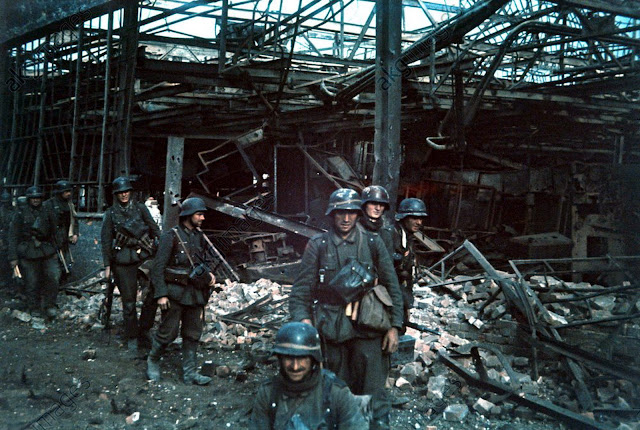
The Germans were confident. Plus based in a Chateaux with extensive wine cellars.
That isn't the only painful choice. The French tanks (not bad ones actually) have half movement points for the first turn so can get a bead on one of the German tanks turn one but would remain in motion. If I wanted to stop and potentially get a shot off before they moved next turn then I would need 2 points of ESB but as they are French that would be +5 on the roll so leading to a high chance of immobilisation PLUS I would need the lead tank to not be using platoon movement so that is an extra task check and if it failed then the two tanks behind would be seriously obstructed.. So no ESB then but let's say I move the tanks along the road in platoon movement and leave them in motion? They could pepper the crew with the machine guns from two tanks which would be a 1 down 1 for the first and 1 flat for the second each so 'might' prevent one of the tanks re crewing. But that is unlikely with elite morale German tank crews and a potential 9-1 tank leader upping the crew morale to nine...Therefore the Germans would swing their VCA around in their advance phase for an unlikely shot. The following turn I could stop and shoot but the German tank would get a shot in first (gun duel with me in motion and the German not is a fairly obvious 'German first'). Running the numbers that defensive fire shot would be a 5-7 to hit (+2 motion target,+1 hedge and +1 small then possibly -1 officer and +1 buttoned up) with the resultant to kill being 8 +1 for 3 hex range -4 armour so 5 to kill with the potential for multiple hits. Allowing I survived the return shot would be 5-6 (10 base +4 non motion slow turret bounding firer , -1 small target, -1 acquire. Possibly buttoned up for +1 (though staying CE to keep the German defenders at the top of that building could be worth a tank)). The 2nd and 3rd tanks could move next door and 2 hexes away so could be between 6-8 to hit. If a hit is obtained then the 1st tank would have a To Kill of 4 and the other two tanks 5 (close). I also potentially have multiple hits as well. So basically I have to weigh up the high chances of losing one and possibly two tanks versus potentially wiping a German tank early and locking the German infantry in place. I am not sure about bore sighting when the vehicle is abandoned but even if permitted it has to be within the weapons LOS And that is in the opposite direction..
The alternative French armour plan is to go over the wall into the orchard and force the Panzers to relocate and hopefully run out of fuel.
I am taking the French hence the somewhat detailed analysis of entry abilities.
Troops wise mine all suck but have a decent range of support weapons with two dismantled medium machine guns and a dismantled mortar. I also have four officers though this is less a representation of decent officers than a need to counter Green troops bad movement rate. The troops are from the 213rd Regiment of infantry from the 53rd Division and three FCM36 tanks from the 7th.
The Germans have armour from Panzer-Abteilung 1 and Infantry from the 1st Infantry Regiment and Storm Pioneer Battalion 43.

Setup: Turns out the shenanigans weren't needed as my opponent had measured the blind hexes from the target hex and not the obstacle so thought there was three, not two, blind hexes.
Turns 1 - 3
As always the best laid plans of mice and men fall utterly to pieces when confronted with anything in ASL. I managed to get four huge stacks into the orchard ready to shoot at anyone getting into the lower tank and my upper three tanks in motion opposite the other. Good.

Then the German turn occurred. The crew from the lower tank hopped in and I had four IFT attacks against it. A 16 up 2 and 8 up 2 a 12 up 2 and a 6 up 2. These generated two pin task check (which were passed easily) then a Morale check. Which would have failed except it was the armour leader tanks tank so instead of 7 morale it jumped to 9. And passed. Things then got worse when the light machine gun on the upper floor of the Chateau took a shot at my lead tank. The hit wasn't hard but it would have needed a double one to kill. Naturally the hit was a double one so the to kill went to 9 minus 4 armour. Still a five was low. The roll was a four and I lost a tank really quickly. [Post blog note: As Bob pointed out in the comments Machine Guns do not double for critical hits so this was a mistake and the tank should have survived.]

The sweeping masses of French troops now started to slow as stack movement became less useful and all the troops started compressing into the west. I attempted to move three squads into close combat with the lower tank. One was pinned, the second failed its PAATC and pinned and the third got into combat where it rolled an eight and did nothing. The tank in return rolled a six which lowered to a five (armour leader) and killed my troops (actually it should have casualty reduced them but these mistakes happen).

This turn was not so bad as I moved my other two tanks very close to the upper Panzer II where I survived a close range hit (it bounced) and an intensive (is missed). My next prep my closest tank hit and bounced then intensive and missed. The second tank then shot and rolled snake eyes. (thank heavens) so multiple hits. Of the two rolls they both hit but one caused a burning wreck so I took that.

For turn three my best leaders were pushing a central Western German squad hard and though lost a half squad and broken officer I did manage to break then KIA the defender. All very well but the German reinforcements then rushed down the road to occupy the victory buildings and my forces are a bit like a disorganised rabble at the beach and are all over the place. And probably pissed so in no state to move anywhere quickly.


Just one Panzer II to avoid. Has a worryingly good crew but is it out of fuel yet?
Turns 3-6
Play resumed in a rather hectic state mainly because I had been painting a bedroom all morning and had to rush to get setup. My initial aim was to get and hold the first building and pressurise the second and in this I generally succeeded helped by an enormous fire group (and something else I did not learn until later). For this update I will use the photos to describe activities (mainly as there is a lot of movement and little fighting going on)

Above you can see the positions at the end of turn four. The Pioneers have ran down the road at the bottom right 'just in time' but I do have a strong spearhead approaching and have the first building (where the 8-0 is)

Next we have the above shot showing the end of turn five. The Germans last reinforcements and 'numeric parity' are fast approaching and I 'still' have not threatened the second building. Though do now have around a platoon inside the Chateau.

Above shows the end of the French turn six. In the bottom right my first attempt to approach the next victory building has ended with another squad TI'd and since the Panzer moved another turn (three phases of movement used so it *might* be out of fuel). My tanks came down the middle and promptly lost a main armament.

But in the German turn things happened. The first was that my bottom right firegroup (a strong 22 up 2 on a stone building) managed to break the occupants of the building and an officer next door. Unfortunately my opponent was very prepared for that and moved another squad in. I lost a tank to an infantry squad and 8-1 officer in combat but started to do better in the chateau. A German squad routed and the other is encircled - though I am also down a squad so it is probably still evens.
The game is probably fairly even at the moment. If I get a decent turn next turn (and break the bottom right squad and potentially the middle squad next to the tank (I have a 4 up 1 then a point blank MA) the I will be doing well (the Chateau is irrelevant at this point). If I dont then my chances drop dramatically. Luckily for me we discovered that my opponent thought I needed to take all three victory buildings so his defence was predicated on delaying me at the bottom and setting up good fields of fire to the upper building. This was why the squad (seen above two hexes above the TI squad which should be disrupted so wrong counter) and is a 5-4-8 is still concealed. It would have been peppering me with fire otherwise. Also why the tank is holding fire why I drop mortars on it - why risk the main armament when your opponent is prepping and not moving? I will take it though as I am tactically outclassed and will take all the help I can get.

The lads move forward. Sure and Steady!
Pre-Planning
Between sessions I often game plan my next turn - much like when Andy Reid was Head Coach of the Eagles where the first twenty plays were organised in advance. Since it is ASL this never withstands what actually happens but can provide an interesting tactical exercise. My 'game plan' for French turn seven was as follows
Rally Phase
Attempt to deploy in V8 (squad without LMG)
Try to fix LMG in O5
Self Rally N4
Prep
A - X9 shoot next door 12 up 3 (success path I failure path II
B - Tank BMG next door for 4 up 1 then MA at halftrack (its hull down) 7 to hit 6 TK
C If path II then fire group V8&V9 at building 22 up 2
D mortar opp fire
E If path I then V8 can opp fire squad, officer and LMG
F O4 shoot next door 8 up 3
Movement
8-0 to Z4
7-0 to P4
Ok its not that complex but it does allow some time to work through permutations. For example originally I was just thinking of hitting the 8-1 leader and squad next door to my tank with bow machine gun and main armament - which would have been a 4 up 1 then (allowing a hit - but at point blank with an acquire it should have been fairly easy) then 6 up 1. But looking at the map I suddenly realised that the half truck was stopped and pointing straight at it so my tank would potentially be a gonna anyway..
French Turn 7
Luck in this game is often cyclical. You can have a group of several games where all your dice are high and conversely your opponent saves everything. Turn 7 was heavily in my favour. I started my walk through plan and successfully deployed, failed to rally but did fix the Light machine gun. Now onto prep. One of the strengths of ASL is that nothing you do is truly guaranteed - you can throw huge amounts of firepower at a conscript squad and it can refuse to break and soak it all up - or (in my experience) someone can throw a tiny amount of firepower at a high morale squad and 10-2 officer and the officer will die and the squad break. So I did not have high hopes of my prep attempts and if I failed then German reinforcements the following turn would make things very hard. As it was no need to worry! Prep A - the 12 up 3 next door rolled a snake eyes. Since all my French Troops were green this meant a double jump cower so it dropped to a 6 up 3 and a 1MC which the high morale German Sturm Pioneers promptly failed and broke.
Wow. The dice gods came through there. The remainder of my shooting was less decent with everything missing bar the tank which box carred its shot and broke its main gun.

The key break in the French turn seven can be seen bottom right. Notice as well the two sole officers pushing key German troops who might rally into captivity or further from the action
I then switched to movement. Both solitary officers had gallant tasks to attempt to re-DM broken squads or to potentially capture more. Therefore I expected both to draw fire. The 8-0 on the right managed to get to its target hex and soaked up a shot from the infantry squad nearby and the 7-0 reached target unopposed. This did give me one issue in that I had wanted to move a squad with light machine gun down the tree lined road to potentially cover my tank and it would be exposed to a 4 down 1 shot from the chateau occupants (they were still encircled so an extra +1 ift). This is exactly what happened and it was my opponents turn for a snake eyes wiping out the squad and support weapon entirely.
Elsewhere I moved my newly deployed half squads forward to try and force the Pioneers in the wood to reveal which they did and only for a pin of one and break of the other.
German return fire was actually more important than we both realised and was not effective. The half track did not bother with the tank (no main armament and next door to an effective tank killing squad and officer? I don't think I would have bothered with it either) and spun to take one of the victory buildings under fire.
In my advancing fire the next key moment in the game occurred. My fire was ineffective bar the mortar which (after some LOS umming and aaaing) went for the half track. First shot hit but did not damage and the second hit and with a three for the damage roll broke the squad after a failed Morale check and due to the -1 for less than four armour everywhere and -1 due to being open topped destroyed the half track entirely! No crew survived either just to rub salt in the wound.
In the rout phase I also managed to take the surrender of both broken German squads helping considerably as they needed the troops..

German Turn 7
The Germans were in some difficulty now and this turn generally covered me managing to casualty reduce the Pioneer squad closest to the victory buildings (they passed the two Morale check..) the turn basically revolved around the Panzer II failing to break the mortar squad with its decent bow machine guns and IFE MA (9 flat...). They gained a pin instead. To the left of the map the encircles chateau squad finally escaped encirclement and moved into combat with my remaining Chateaux squad. With a concealed officer they easily won the ambush but only managed to casualty reduce me to the melee continued. The German 8-1 and line infantry squad moved into combat with my last tank but only succeeded in immobilising me! (rules question here for anyone out there. If a tank is immobilised in close combat then does the squad still take a morale task check and potentially evacuate the tank? We decided they wouldn't and the decision did not impact the game but might have so just asking).

The Germans would win both melees but too late to help with the victory conditions.
Turn 8
French turn 8 was mainly skulking and re-organising the key victory buildings. I did shoot with triple point blank fire into the tank melee and managed to pin the leader though the squad survived. Close combat this turn led to neither side killing each other in the Chateau and the squad fighting the tank managing to immobilise it again (with the officer un-pinned that would have been an easy kill for the Germans). The key action therefore occurred in the German turn. Firstly the Panzer started up and my mortar hit it once with unsurprising lack of effect (it kept rate though). Apparently this particular Panzer (with the 9-1 leader) rolled a six for its fuel total so had plenty of turns still of movement (the tank I destroyed typically only had rolled a two). It moved over and rolled right next door to one of the victory buildings and attempted a 9 up 2 bounding fire shot (which missed or it hit high and I passed the morale check). It then attempted smoke but I was fairly certain that was not allowed post shooting so after a rule dive that did not happen. Apparently the plan was to move a squad with a demolition charge into the smoke to try and blow up the building. I don't know if that would be more effective than the nine up two bounding fire shot as that squad would have taken a sixteen flat shot from the squad and officer in the building even with the smoke then an eight flat final fire without thinking of the other four or so squads equally close. I suppose I could potentially dropped some nasty fire lanes as well which would have activated for the dc attempt (perhaps, I would have to check the rules on demolition charge placement).

The Panzer II F rolls forward in a valiant attempt to break the deadlock!
As it stands it was too dangerous to try and move the squad up unshielded due to the amount of negative two and three shots that would occur so instead the German plan seemed to be to leave the tank there (French chances of having Green troops passing a Task check to get into combat are low and even before that the Panzer would get an eighteen up two against the building next door) so the just rallied squads and officer higher up were shifted closer to the action where one of my light machine guns managed to pin all of them with a low odds shot.
It is obviously turning into 'one of those turns' for the Germans and then my defensive fire phase arrived and my mortar opened up on the Panzer II. Even lower odds this time but I still get the -1 for all armour being less than 4. The first roll was a hit with rate and an ineffectual damage roll (11 I think) the second was a hit with a four (and rate!) but the damage roll was a three and due to the minus one for low armour causing the tank to be immobilised. The crew needed to pass a task check to stay in the vehicle and rolled in double figures abandoning the tank to get riddled with fire from the troops next door alongside hazardous movement (sixteen down three) getting killed piling out of the tank... (Thus the mortar on its own managed to rip the heart out of the Germans best units and the key attack 'failure' was the Germans 9 flat failure to break them in German turn six and seven..)


We then rolled the tank combat and my tank finally succumbed to the German attackers before my opponent conceded.
Conclusion
Yet another fun scenario from Croix de Guerre and my first victory in a while. Admittedly without the scenario victory conditions misunderstanding I would probably have lost even with the turn of great rolls. It is a nicely balanced scenario with the map and reinforcements nicely balanced to ensure a continual adjustment of the odds. It is also nice that the French start as attackers and gradually switch to defenders as more and more Germans arrive. The Germans also have several interesting setup decisions to make as if they don't screen the forward tanks with a squad (and probably machine gun) then the French have a decent chance to prevent it being re-occupied at all but utilising that placement prevents the Germans being able to more easily roll back to delay the French advance on the victory buildings early. My opponent took that risk and it panned out.
The German tank fuel rolls also add an interesting adjustment to how the German player needs to play. Roll low and with low fuel and those tanks might literally be like forward pill boxes whereas roll high and things can change quite drastically.
One thing anyone playing this does need to pay attention to is the Line of Sight to the board edge. The orchard only creates two blind hexes (not three) and we worked out post scenario that one of my approach routes (a bypass of a central wood) was actually IN line of sight of the German light machine gun at the vertex point. This would have potentially broken a stack up early on which would have helped the Germans big time.

The German advance was halted. The soldats had a deserved 'selfie'

Good AAR: just a heads up regarding the LMG kill on the French tank. MG do not get critical hits, so the TK never doubles (read toward the end of the EXC in C3.7).
ReplyDeleteCheers! and thanks for the rules update. This sort of thing is very useful to be picked up on. If that tank hadn't popped then it might have made it more even (without my opponents victory conditions mistake and my lucky round seven in shooting I was easily losing)
ReplyDeleteI think you made an error with "it was the armour leader tanks tank so instead of 7 morale it jumped to 9" on French turn 1. D3.43 says "An Armor Leader ceases to exist once the crew takes counter form" so the crew has 7 morale until it gets into the tank as per D5.43
ReplyDeleteThanks Eric.
ReplyDelete