VotG9 Eviction Notice

A Pak38 of either the 518th Infantry or Pz.Jag.Abt.295 in central Stalingrad somewhere about the time period of the scenario.
For my next scenario I have the Germans defending central Stalingrad in September 1942.
The 295th Division had had a torrid time and was slowly fighting its way through the mainly ruined central section of Stalingrad East to North East of the main railway station. As often happened to units in Stalingrad the division was slowly becoming wraithlike in both numbers and combat capability.

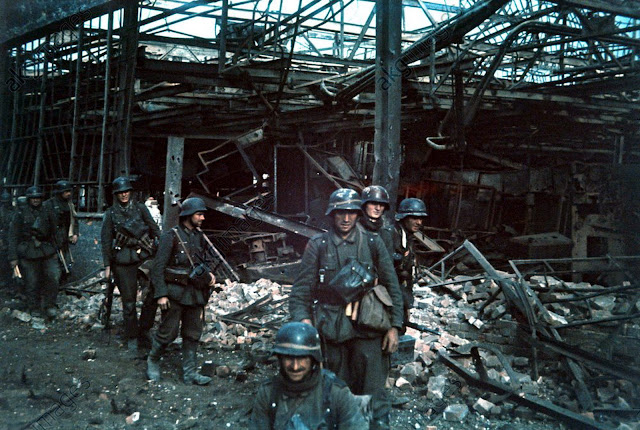
Wonderful Stuka shot of the Northern part of the central city. The engagement area for this scenario would be immediately to the right. The burning buildings are School No 38 and the L-Shaped House (which can be seen in hexes R9,Q10 and Q11) the buildings by the volga at the top of the photo are the NKVD-Gpu house also on the northen Votg map.
Around the 18th September the Division was pretty thin on the ground and was about to be hit by a serious of aggressive Russian counter attacks by their 13th Guards Rifle Division along with heavy tank support primarily pushing down the North-South roads

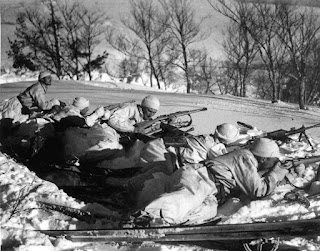
This photo (of the 194th infantry) was taken just South of the combat area (just North of Kurskaya Street) taken on the 16th September looking towards the combat zone. The 194th was the 518th's immediate neighbour at this point and the counter-attacks have not quite started hence the apparent unconcerned 'walking'
Engagement Terrain
I do love campaign maps and 'most' campaigns have some easily playable stand alone scenarios that allow you to get a taster for the map and campaign play and for Valor of the Guards the simplest scenario is this abrupt and fast scenario that comes in at a mere 4.5 turns with around fourteen counters for both sides. The combat zone is equally small thus avoiding many of the weirder rules with only ruins and squares being particularly unusual. There is also one solitary factory hex and only one larger building.
The scenario nicely sets up a very specific structure. The Germans have a line of weary infantry represented by some 1st line troops from the 518th Regiment of the 295th Infantry Division. These troops have a mix of support weapons and one out dated anti-tank gun. To 'force' actual tactics every stone building in the 'primary' front line must be occupied by at least one multi man counter thus representing a long defensive line of tired men. Equally representative is that the Germans also have a Sturmgruppe of more sub machine gun armed troops with much better leaders representing exactly that and probably the elite of the Regiment/Division. These troops have just advanced a block and captured a tiny bulge just beyond the current main German line. The Russians (Infantry of the 3rd battalion, 42nd Guards, 13th Guards Rifle Division and the 23rd Tank Corps having just recently (and famously) crossed the river are furiously counterattacking.

Taken at the junction of Saratovaskaya and Kurskaya Streets this is of either the 518th or PzJagAbt171 but again is just South (to the left) of the combat zone involved. This exact junction is at O26 on the map.
Now this type of action was very common in Stalingrad so kudos to a very flavourful scenario. The Russian is the attacker and has to choose whether they try to sweep away the main German defensive line OR wipe out the bulge and the German Storm Troopers.
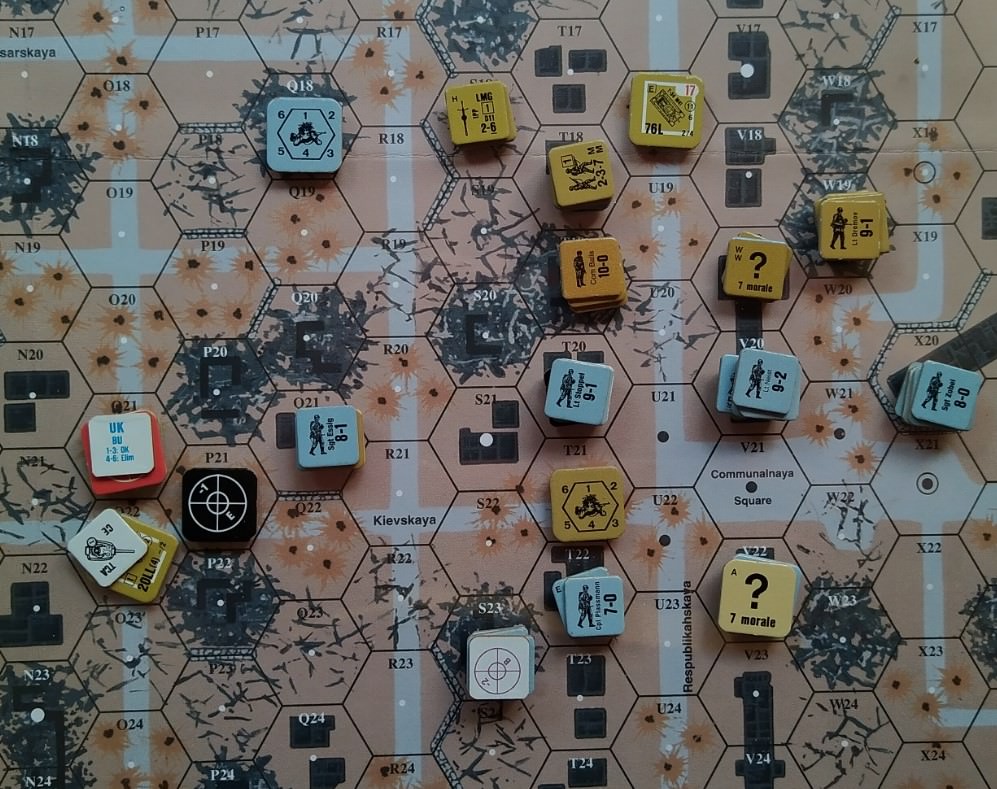
Setup
I am running the Germans and apart from some attempt to hide the locations of some of the primary weapons/leaders have been forced by the setup restrictions into a more limited setup than normal.
Main defensive line
What I don't want is the Russians to get an easy overwatch on the road. S21 and T21 are key road hexes as they have foxholes so can be used to move troops to reinforce against wherever the Russians main thrust will come. The Gun is HiP in Y20 and boresighted at T20 (hoping for a bypass shot perhaps and if not then it is well placed to drop shots on infantry). The medium machine gun is in T22 I actually dropped the best leader on top of an ATR in the factory at X20 in an attempt to hide this location. X20 is a good fall back but if the troops inside break then they cant go anywhere due to the square so I felt the machine gun was better in a more central location. The mortar and the other ATR are in the stone rubble in S23 - one of the few locations the mortar can sit with some protection and still shoot. (Though post scenario I just realised 90% of the buildings are gutted so do not have a roof so presumably the mortar can shoot almost everywhere)
For the storm group as the Russians cannot get next door turn one concealed I have the two good leaders each with a full squad and light machine gun in the front line. The other troops are scattered to provide covering fire with the demolition charge behind the best leader.

Russian Setup
The Russians look like they have decided to crush the assault troops directly. The two light tanks are facing my left flank - probably to act as mobile flanking forces and the T34 is in the center. This looks like it may try and early VBM freeze - probably against V19. The main Russian infantry force is in the North with only a squad to the left (well in Stalingrad that's probably a company-battalion).
Russian Turn One
This is a fast and bloody scenario and the Russians went straight for it. Apart from a large stack comprising 2 4-4-7s with light machine guns prep firing at some of the Storm Group (and failing to do any damage) they went all movement with the tanks moving to flanking positions. Considering the firepower being thrown around there was very little damage at all until a Russian squad took a 1MC and snake eyed to berserk status and then the Commissar and squads all broke in the defensive fire phase. Useful but they will be back soon enough in all likelihood.

Turn one and the rubber is already hitting the road
In the first German turn I decided to ramp the pressure up and not be defensive and launched my own local counter attack on the Russian right whilst moving troops forward around the center to attempt to draw fire from the troops sitting with opposition at point blank range (and hopefully) to reveal some of the concealed stacks. I also started a single melee in Q21 where even though I won the ambush roll neither of us succeeded in damaging the other! All Russian 1st and Elite troops are stealthy and hand to hand is available so any close combat on the Germans part has a bigger element of risk than normal. One other key event was the Russian 7-0 being drilled by the German sniper further weakening the Russian right flank.

You have to love the sheer unpredictability of city fights.. Rather than shoot at the lone 6-2-8 next door to my 9-2 took a 'longer odds' shot at a big stack of three first line squads and broke them all (ELRing and casualty reducing one) and on the left flank I moved into combat with the shocked tank destroying it in combat. One interesting event that occurred mid turn was when I attempted to drop the demolition charge on a concealed 6-2-8 next to my 9-2 in V19. My opponent decided to retain concealment and let me so I then late cxd and ran into the hex to strip concealment. After some rules/fb searching we decided this could be done but its useful to note that the demolition charge still has to apply concealment as they were concealed when the demolition charge was placed. As to 'why' if the DC failed to do anything then the unit is at least exposed for the next turn.

Troops from the 518th and a 7.5cm M18 Infantry gun drag their weapon deeper into the city (14th September 1942)
Anyway rather than roll everything on moving my 9-2 and a 4-6-7 squad into combat with it (even if they win they would be next to a 9-1 and two 6-2-8's) I shifted them upstairs. Though the building is gutted it just has no roof. This way there are less easy point blank shooting options for the Ruskies.

German reinforcements are being called from across the road.
We stopped here for the week and things are looking precarious. If I was the Russian player I would break the squad that killed the tank with point blank fire (12 up 1 - wreck) which on an average roll causes a 1MC which on average roll the squad should fail and then run down the squad plus light machine gun in S18 to destroy through failure to rout. To stop that squad I would have two 2 flats - on an average roll doing nothing and one 5 down 1 (which stops that squad plus officer shooting next door) using the average method would cause an normal morale check which on the average roll pins... Basically I have to be lucky or he unlucky for me not to lose that flank but it is ASL so it is just an indication of risk really.
On the other flank I would be tempted to drive the T34 down and to overrun the medium machine gun in the street. I don't have a huge amount of options to deal with that including the AT Gun ( T20 is boresighted so I get a -2 acquire if it tries to be clever and bypass to avoid the square so would be 10 base -2 bore +2 moving so a decent 10 or if the road is used then -1 for it being the wide boulevard so 9's) but the hit after is a much less decent side armour shot of 10 tokill -6 armour so 5 to do something and 4 to do something good. Depending on T22 rallying I may have a street fight there and a cc reaction fire from the medium machine gun squad if it survives the overrun. Either way a lot of shots and fire power will have been used allowing the rest of the Russian forces to swarm forward into probable multiple close combats. Should be interesting..

Signal troops from the 518th Infantry doing something? in September 1942. Note the couple of Hiwis sitting down to the left.
Restart
Sometimes your best guess turns out to be crap. First up 'the good' all three of my broken squads that I could rally did rally (there's a first) - all needed between 5-6 or less so 'woot' especially as in an instantly my left flank looked threatening again. In the rest of the turn the left flank went down much as I expected with the squad breaking and the Russian hightailing it down. I had missed the rubble blocking line of sight to my mortar so only had two stop shots which both had no impact. To finish the tail of the left flank it was not as bad as I thought as I suddenly realised the rubble blocked line of sight to the Russian squad so it could get out safely picking up the officer along the way.
In the center the Russians moved backwards and skulked whilst the tank and squad to the right took positions to encircle my 9-2 leader and 1st line squad (must remember the upper floor encirclement rules) they survived this round but were broken and erased for failure to rout in the next turn. Bad perhaps but equally that meant a large tank and three 6-2-8's a dc and a 9-1 officer were basically focusing on one opposing squad so it had some advantages.

The key thing for me was that the lack of pressure on my line troops trying to reinforce and in the center meant that I could get into the stone buildings on my turn. The damned Commissar was an express train of rallying and has so far only managed to casualty reduce one of his own squads (a 6--2-8 this turn hohoho though this appeared to steel the resolve of the half squad and conscript squad also rallying as they both came back) so to continue to 'spread' the attackers I decided to also try to repeat on the right the trick I was trying to pull on the left and sent all the troops in the waterworks out to draw fire (failing) and to sneak up to the W18/Q19 stone locations. The idea being to prevent the Russians using their own strong right flank to swamp my center.

Troops now moving to threaten the Russian left and I have further reinforced the left.
In the centre I managed to break both the single Russian squads holding their front line and move into a much more secure shape with S21 functioning as a potential rout location. That was the 'good' the bad was the demise of my 9-2 and squad from a T34 shot, the breaking of my anti-tank rifle squad in the road on my right, the half squading of an assault squad in the center. My troops were also slowly being chewed up.
Last turns
After the previous turn skulk the Russians turned on the pressure. The T34 relocated to the left flank the Russian left spread out to 'deny' my infantry the right side buildings and on the left my ATR squad along with the 8-1 was broken by the T60 and T34 respectively. For all the movement I still had my own turn to respond and my turn was vicious. During the rally phase my 8-1n snake eyed his morale check and battle hardened to a 9-1 and then the Commissar casualty reduced a broken full squad then with a box cars wiped out a full broken squad. When added to my wiping everything next to me and requiring the Russians to have to get to God like levels to deal with all the German threats and the game was conceded.

Position at end. The Germans have plenty of troops down south to protect against the second win condition (especially with the square making it dangerous to drop South) and if they used the required troops to take the center then the left and right would not be easy to contain
Conclusion
Most Stalingrad fights are epic and this was as well. Numbers are very even so if I was the Russian I would be tempted to also take the 10-0 Commissar but to leave him centrally placed and to try and get in as many close combats as possible perhaps throwing the tanks into VBM as much as possible to allow the close combat troops to get close. The Germans have too many options to counter attack if the line is attempted to be dealt with by fire alone (in my opinion which admittedly doesn't count for much). We also both forgot we both had plenty of troops with assault fire so woops.
For another view of the scenario the excellent Grumble Jones has his own AAR here as his 'cardboard warrior' here
Notes
The blog photos were all taken from Jason.D.Mark's excellent 'Angrief - The German attack on Stalingrad in Photos' which is an excellent book. All copyright either his or originators.
Any of his books on Stalingrad give a good idea of the battle but for the action in this area of the city I particularly recommend 'An Infantryman in Stalingrad' which is another Mark's book that covers the fighting just South of the VotG map but, rarely for Stalingrad, is very detailed on infantry and Stug+infantry co-operation in taking this part of the city. Very few German infantry officers survived to write memoirs on the subject so we are perhaps fortunate that Holl (the author) returned to his unit in September after having been injured so was perhaps fitter and healthier than his compatriots and thus managed to survive his incarceration in a Russian prison camp.

Here is a photo taken 14th September 1942 of the OIC of the 295th Infantry Division - GeneralMajor Rolf Wuthmann and the OIC of the 518th Infantry Regiment - Oberst Otto Korfes

Great AAR. Mark’s books are definitely the gold standard on Stalingrad.
ReplyDeleteThanks mate. I agree on the books..
ReplyDelete