RO3 - Defenders of Stalingrad - Setup and Turn 1
Change in blog report style here. I will be writing a detailed AAR (more detailed than normal) but to avoid reader fatigue will be reporting in half turns or full turns at most so there will be multiple smaller updates. It will be interesting if people like (or hate) it.
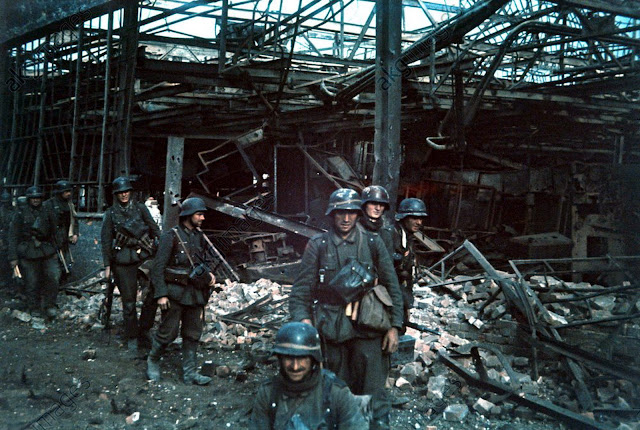
Anyway I do love a Stalingrad Campaign map scenario and this medium sized scenario has a small zone of operations and a funky setup structure that nicely enforces the mess of attack/defence that city fighting could get to. The scenario uses a more complex phased set up structure with firstly the basic defenders being forced to setup all over their defensive factory. The German defenders get to setup next and they can populate any factory location which is more than 1 hex away from any Russian (and over hex 20). This means if the Russian in step one does not step out then the Germans can popup behind them, above them basically all over the place - perhaps the Russians would desire this but it seems the indication is more to ensure the initial Russians are less focused defenders and more realistically defending 'their' prepared positions they usually fought in. For the Germans they have to decide whether to hold the West of the Factory in force or whether to try and interdict the other attackers and possibly to overwhelm the initial group before the others get there.
Next the Russians get an NKVD group who set up close to the East. They can easily reinforce the Eastern end of the Factory at possible risk of some German interdiction. Finally the Russians get another big group of the 120th Guards Rifle who represent the defenders of Hall 1 and 2 and who are about to launch their own counterattack against the Martin Shop. So to summarise the Germans are attacking a weaker force of Russians in the Martin Shop but at the same time the Russians are attacking the Germans from the North and reinforcing from the East.
The Soviets do have a large preponderance of force and factories are easier to fight through once inside but have to get there and only have five and a half turns to hold ALL ground level hexes of the Martin Hall. All Red Factories special rules are in play so as this map has four chimneys the Russians not only get a SAN of 5 they also get the possible SAN of 3 (RF 5.82). Plus Level C Booby Trap capability (B28.9). Their force is also all elite troops and is heavily tooled up (for Russians).
The Germans have a mix of Pioneers from the 40th Panzer Pioneer comprising the feared 8-3-8s along with double the strength of line infantry from the 179th. They also have plenty of infantry support including a flamethrower. Officer levels match the Russian with the Germans also having the only 9-2 but the Russians have a commissar to counter (perhaps). Since there is no scenario defender the Germans don't get to bore sight or potentially set DCs which also matches the ' Germans have attacked and gained a foothold now the Soviets counterattack before they have a chance to dig in/bring up heavy defensive weapons' nature of the scenario.
The Setup

Turn 1 - Soviet
Apart from setting two machine gun groups on observation fire the Russians pelted forward in an attempt to force a weakness in the Germans positions. This, as could be expected, generated some nasty breaks due to the amount of high firepower defenders. Some of the worst were the commissar and squad dashing the road and getting taken down by a 2 dash 2 with the Commissar breaking and the squad pinning. The forces in the factory faired better with one 4-5-8 breaking right on the line between Germans and Russian. The Guards Rifles had a torrid time though. The little 2-4-7 on the roof proved an excellent choice as it took out an entire 6-2-8 (mainly due to the FFNAM and FFMO bonuses) with a further three squads taken out by the Pioneers in defence. Not all went swimmingly for the Germans as the HMG broke ! And the 8-3-8 and 4-6-7 on the front line of the factory at R21 broke with an (admittedly successful) FPF shot. Other worries for the Germans at this point include an 8-0 Russian officer with 4-5-8 plus demolition charge sneaking around the rear west flank and one of the 8-3-8 defenders in Hall 3 on R24 pinning. This could prove problematic as though the FT next door 'should' take out one of the neighbouring Russians the other one is concealed so has a good chance of an ambush win.

After the rout phase where scarily large amounts of Russians left the front line the position became clearer.

The Russians still have units to pressurise the Nazi scum especially as their unit levels are dropping and valiant comrades have outflanked the German positions in the West. IF the Russian units can remain semi-resilient to the German prep fire next turn then things will be looking strong. The close combat phase ended with two combats. The first was in Hall 3 at R24 when a concealed Russian 4-5-8 took on a pinned 8-3-8. All Russian 1st line and elites are stealthy so the ambush role gained -2 concealed -1 stealthy and the Germans on +1 pinned. The dice still tried to block this with an unimpressive 6 (dropping to a 3) the Germans then rolled a 4 (rising to 5) and no ambush occurred. The Russians declared hand to hand and at 1 to 2 odds still erased the stronger German squad (who attacking at half firepower as pinned at 1:1 failed to do the same). This gives the Russians a nice breather in the center of the board. The other combat was at X26 in Hall 7 where the concealed Russian attacker also managed to roll a 6 and fail to ambush. Also declaring hand to hand this turned out to be a mistake as the Russian squad was efficiently removed by the German defenders. This flank would look ropy for the Soviets now but the hordes of NKVD piling into the East end of the Martin over would seem to counter this.
Turn 1 German
The Germans decided to slug things out - there isn't much use for skulking with this many opponents and it went well with the Russians failing a succession of shots. Since the West of the Factory is already under considerable pressure the Germans also upped the anti by trying tu use their sapper inherant demolition charges first by taking the risk of chucking them next door. The squad in N22 succeeded breaking and ELR ing the 6-2-8 in the factory next door then using leader directed inherent to break another squad. The other 8-3-8 faired less well only succeeding in making the Russians next door go berserk and breaking themselves. Woops. Once again the 2-4-7 on the roof proved useful breaking a third Russian on that side and effectively negating much of the Russians flanking attack. All is not dead for the Soviets as the kill stack over in O16 managed to break the 9-2 leader (the squad proved built of sterner stuff and passed both that check and the LLTC). The leader had to rout up the staircase to the roof only just avoiding death. They also still have the far flankers now joined by a broken squad who re-broke the Germans who had routed to the O23 building in the Russian turn.

In the center shooting was again efficient (but with 16 up 1s and the flamethrower in play you would hope it was with only internal Factory TEM in play) especially as the Medium machine gun there went on a three shot rate tear. The Russians forwards factory line basically collapsed in a heap. In Hall 7 the Germans failed to break the squad in the shell holes next door (they did pin it though). A nicer sequence for the 179th occurred when Lieutenant Frietang advance moved (concealed) next to the 4-5-8 in Hall 3 in W25. The squad shot and generated a single Morale check which the Germans passed (setting of the Russian sniper who did nothing as it was a pin result on a broken squad). The Russian squad then shot again at the now revealed Germans and missed. This allowed the 2-2-8 with dc to get to the next hex with the Russians declining a FPF shot. In the advance phase the German squad shot at the broken Commissar (having a nice line of sight) re-breaking that before they advanced into combat. No ambush occurred (luckily for the Germans) and the Germans declared normal melee as the odds of HTH did not seem good. They destroyed their opponents whilst the Russians tried for a 1 to 1 and failed.

The key now is how much of the Russian attackers will rally next turn especially in the center. It might turn out that unluckily losing the Commissar will prove a deep wound as well..


Comments
Post a Comment