FB16 - Crossing the Bloody Meadow
After several pbem games I had started with another ftf opponent on start kit and when one of my previous opponents noted I was playing again offered to re-start. This was the first of several games over a year or so.
Back into the maelstrom of Festung Budapest my next game had me taking the gallant Soviets trying to crush Nazi scum in the Steam Railway station whilst a strong force of SS and Hungarian Assault engineers tried to rescue them. It took a while to try and ‘grok’ all the various rule even beyond the usual ammo shortage but grok them we did and setup occurred.

My plan was very Soviet. The German forces in the Steam Wheel station are under ammo shortage 5! so lots of shooting should start whittling them down even if I miss all my shots in return. Therefore I resolved to throw all my forces forward to draw fire and let the ammo shortage do its work. I reinforced my ‘Eastern’ forces slightly to help both hold back the German reinforcements and stop squads escaping over the meadow. Hopefully I will have most of the factory dealt with by turn 2 and can then hold it against the second wave.
The Initial Assault
Best laid plans of mice and men and all that. My plan sucked. Not in its concept but in the die rolling. In the first turn the Germans rolled between 6 and 7 every single dice roll so not one squad was hit by ammo shortage and my own forces (I consistently rolled 9-12 in that first turn) got absolutely ripped to pieces. My only unit that was capable of rolling lower was one of my 6-2-8’s which stomped through the (expected) minefield and gained fanatic status and a hero along the way before moving into the top left hex of the factory and finding it fortified and unoccupied.

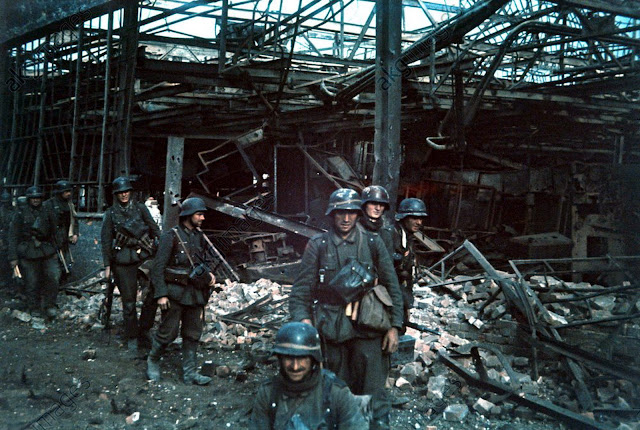
Here you can see my initial excursion into the station.
I’d like to say that the German rolling got worse, it certainly had a couple of breaks but instead fairly consistently started rolling 5 and 6’s. My own dice improved but improved with several 4’s (7 in fact with no less than 5 causing active snipers with 1 kill sniper and 4 lesser injure ones – as if my forces had enough troops to cope with that. The German sniper wounded my hero, killed my base leader and pinned/broke other squad preventing me strengthening my building hold. That attack had been going well, I had managed to place a dc which destroyed the squad next door. Unfortunately they broke my own squad with a final fire attack meaning we each had a hero glaring at each other. I advanced into hero to hero combat but found my hero was more of the ‘heroic corpse’ variety and he was easily killed by reinforcing SS. Still not all was bad as one of my T34s managed to wipe out the crew of an AA gun and my ever lasting flamethrower broke no less than two SS squads at the other side. Unfortunately it does no look like I can take advantage though a key rout phase turn three roll will be if the wounded German leader can rally either of those two squads.

The station end of German turn 2
The reinforcements
The German reinforcements pushed forward aggressively enough under smoke (when possible). Here I was helped by the Stug malfing its main armament with its first shot (Huzzah!) but otherwise my units gave as good as they got which is unfortunately not quite enough when that heavily outnumbered.

Here you can see the Germans moving forward, Note WW13? which does not contain rubble.
I hit setup problems here. As can be seen in the above image a WW hex does not contain rubble. This was a problem as it should and the very large SS kill stack on the far right of the image sauntered past my lads who a – did not shoot when they were higher thinking that they could get them closer and then found actually they could not see as there was a big pile of rubble. Soviet schooling obviously failing there.

Oh look ‘rubble; and preventing me blocking the reinforcements.
Now we stopped for the week here and this introduced one of the improvements play by skype can have over ftf. I now had a week to look at the board to try to resolve the tactical problem that I now faced – minimal troops, lots of strong enemy etc etc and thus went into the start of turn three with a very specific plan in mind. I would have to get the tanks more proactive. One I would send across the ‘Bloody Meadow’ where it would be out of panzerfaust range but able to prevent Germans swarming towards the factory (from that direction) and to threaten both the Stug and the factory. The other had an even more key role.

In the shot above we can see the two key problems. One I could not deal with – the top right corner of the station had a wounded 9-2 officer with two broken SS squads. If he failed to rally those DM squads then that side of the factory would be easily taken. If he succeeded then things got a lot more difficult. The problem I could deal with was the super kill stack to the right of the stack. This had three full strength SS squads with one mmg and 2 lmg and a 9-1 officer. I had to slow them down or block them from getting to the factory. Anyway the plan I came up with can be seen in the following shot (taken at the end of the Russian turn 3.

So a tank moved ip to TT15 and took area acquisition on VV14. Supported by a rallied 5-2-7 from TT16 which moved to VV15 and a 6-2-8 + LMG to VV13. Finally a different 6-2-8 + lmg moved to XX12 (just seen top right). This could still lay fire down a higher road putting pressure on the other German kill stack and sealed the rear to prevent the Germans disengaging and taking a different route. What I wanted was for the stack to prep delaying them a turn or hopefully get mashed moving through VV14. Nice plan, it did not work. Some things did that turn. First up both SS squads rallied (typical) and when I moved next door I also found the Infantry gun was also hiding there.

Lt Pavlov with his ever fueled flamethrower was the main reason the game was as even as it was
Fortunately my super flamethrower took another 12 shot at the hex from TT15 and caused an MC2 which broke everyone and wiped the gun crew of the face of the earth. You can also see a concealed Russian on RR15 here – though my officer had failed to place his dc (and been broken) another good advancing fire shot had killed the crew. So at this point things seemed to be turning around.
Nothing lasts for ever and in this case ‘nothing lasts until your opponent rolls like a demon’ would have been an appropriate comment. Here is the position after the German turn three finished.

The Germans prep fired 2/3rds of the stack which broke my squad in VV13 (which fortunately would remain there to prevent the remaining squad running up) with the final concealed squad advancing to VV14 here it resisted every shot I fire at it with the end result being no damage done. Nice. The Stug meanwhile had destroyed its own main armament (but was not recalled due to SSR) and proceeded to try and overrun the conscript in SS13. These conscripts blasted it with just enough power to pin the CE crew. Who promptly buttoned up so could no longer use their remaining mg making it a rather weak overrun.
The game was turning into a slaughter house at this point. Broken units where being wiped for failure to rout all over the place as everyone was intermingled but it also now introduced some of those ‘film’ moments that the game does so well. First up I had rallied and moved the broken officer (with dc) seen above in TT16 to the roof of the station to erase the SS stack that had been in SS15. Whilst there I thought I would just chuck the dc off the roof onto the wire at TT13 where a single SS squad had got stuck. Would have been great but did no damage to either of us. Still I enjoyed the ‘first time’ of dropping one of them from a great height. The picture below shows the position just prior to the next turn chucking.

My most effective unit – my officer plus flamethrower had in the meantime advanced to RR13 where it promptly ‘found’ the last German minefield. Fortunately this did not break it. Another ‘film’ moment then intruded as my opponent, showing great tactical awareness drove his Stug into the factory to try and overrun the flamethrower or at least to bypass freeze it to keep it away from the super stacks. This half worked with the flamethrower turning the Stug into a blazing wreck but then getting shrouded in smoke. Cool tactic though. The flamethrower did not last a lot longer as it took fire from the approaching (slightly smaller) SS kill stack and broke leaving the flamethrower behind which appeared to help in starting a fire in hex.

Things were looking shaky again now. The German sniper carried on being effective (killing my medium machine gun unit on OO13 and killing the broken flamethrower officer whereas my sniper woke just once (once all game!) to break the TT13 SS squad. I would not have minded so much if the Sniper had been activated on IFT rolls but every bloody time it was a morale check where rolling that low made little difference to one slightly higher.
Speaking of the SS squads they now, finally, started to see the effects of low ammo. The squad in TT13 failed to get broken by anything (until my sniper got him) but by that time had broken and destroyed his light machine gun and low ammod his way to conscript status where he then appeared to be kicked out of the SS. Other low ammo rolls then reduced the squads in PP13 and PP15 which helped allow me to eventually seize all the building. The remaining Germans were pelting up though and bar one bad spate of morale checks on the other kill stack (broke three of them ho ho ho) pressure was mounting. One of my tanks was brewed up by a panzerfaust (the top right one above, the other kill stack can be seen just behind – this is the one that then broke to a Subsequent fire shot as it left the cover).

The final turn was a magnificent mess. German reinforcements piled in from all directions. The Hungarian officer and squad seen above tried to loop around RR11 and QQ12 where my tank broke the squad and pinned the officer. Other reinforcements were charging forward only to get his with a SFF shot from UU13 which pinned the officer (but no one else) which was just enough to prevent them having the movement to get close enough to do anything. A further SS squad moved into the wreck hex of RR13 and promptly broke as they walked over their own mines (take that Nazi pig-dogs) and were promptly killed by a single officer (who I had moved in to try and get the dropped flamethrower before everything exploded, (that would have been great, pick that up and then the following Defensive Fire phase blast the super stack with a 24 flat shot as they moved into the station….but it was not to be). This allowed the SS stack in SS13 to enter the factory in SS14 on the final turn. Everything depended on the continuing (normal) combat in PP15. For me to win I would have to a – not die and b – kill the German squad as without that I would not control the hex. The Germans rolled first and rolled high. Now my turn. I rolled and ..and .. failed to kill the Germans. They had won.

Make Germans go ‘pop’ Sergei
This game was a blast though. It did give a great impression of a city fight and the extra chrome did give things a different spin. I was pleased that though I had managed to almost lose the game in the first two turns (how many 5-7 rolls can one person make in a row – plus 7 ‘kill’ sniper results in a single game all off morale checks PLUS PLUS no low ammo rolls (due to those 5-7s) until turn 4!) gave me a bit of a mountain to climb. The weeks rest allowed a better plan to cope with the new situation that delayed the Germans just enough to make a game of it until the end. As an added bonus I will remember the stug charging into the factory and the failed dc off the roof for quite a while.

Comments
Post a Comment